- February 2013 (2)
- April 2013 (1)
- May 2013 (1)
- June 2013 (4)
- July 2013 (11)
- August 2013 (2)
- September 2013 (2)
- October 2013 (2)
- December 2013 (1)
- January 2014 (9)
- February 2014 (6)
- March 2014 (10)
- April 2014 (7)
- May 2014 (8)
- June 2014 (7)
- July 2014 (3)
- August 2014 (15)
- September 2014 (10)
- October 2014 (7)
- November 2014 (2)
- December 2014 (6)
- January 2015 (3)
- February 2015 (6)
- March 2015 (6)
- April 2015 (5)
- May 2015 (5)
- June 2015 (3)
- July 2015 (1)
- September 2015 (1)
- October 2015 (1)
- November 2015 (7)
- December 2015 (7)
- January 2016 (12)
- February 2016 (7)
- March 2016 (9)
- April 2016 (8)
- May 2016 (5)
- June 2016 (6)
- July 2016 (8)
- August 2016 (8)
- September 2016 (5)
- October 2016 (7)
- November 2016 (1)
- December 2016 (6)
- January 2017 (3)
- February 2017 (3)
- March 2017 (1)
- June 2017 (1)
- July 2017 (1)
- August 2017 (2)
- September 2017 (3)
- November 2017 (1)
- December 2017 (1)
- January 2018 (1)
- February 2018 (1)
- May 2018 (1)
- June 2018 (3)
- August 2018 (3)
- September 2018 (3)
- October 2018 (5)
- November 2018 (2)
- January 2019 (1)
- February 2019 (2)
- March 2019 (3)
- April 2019 (3)
- May 2019 (5)
- June 2019 (2)
- July 2019 (4)
- August 2019 (5)
- September 2019 (5)
- October 2019 (5)
- November 2019 (3)
- December 2019 (6)
- January 2020 (6)
- February 2020 (4)
- March 2020 (7)
- April 2020 (5)
- May 2020 (4)
- June 2020 (3)
- July 2020 (5)
- August 2020 (5)
- September 2020 (4)
- October 2020 (7)
- November 2020 (4)
- December 2020 (3)
- January 2021 (3)
- February 2021 (5)
- March 2021 (8)
- April 2021 (4)
- May 2021 (5)
- June 2021 (7)
- July 2021 (4)
- August 2021 (5)
- September 2021 (3)
- October 2021 (2)
- November 2021 (2)
- January 2022 (2)
- February 2022 (1)
- March 2022 (2)
- April 2022 (1)
- May 2022 (4)
- June 2022 (6)
- July 2022 (6)
- August 2022 (5)
- September 2022 (4)
- October 2022 (3)
- November 2022 (1)
- December 2022 (1)
- January 2023 (3)
- February 2023 (2)
- March 2023 (5)
- April 2023 (3)
- May 2023 (3)
- June 2023 (5)
- July 2023 (1)
- August 2023 (1)
- September 2023 (3)
- October 2023 (2)
- January 2024 (2)
- February 2024 (4)
- April 2024 (2)
- May 2024 (2)
- June 2024 (19)
- July 2024 (3)
- August 2024 (1)
- September 2024 (4)
- October 2024 (4)
- November 2024 (4)
- December 2024 (2)
- January 2025 (1)
- February 2025 (3)
- March 2025 (1)
- April 2025 (1)
- May 2025 (3)
- June 2025 (3)
- July 2025 (1)
- August 2025 (2)
- September 2025 (1)
- October 2025 (1)
- November 2025 (4)
- December 2025 (1)
- January 2026 (4)
- February 2026 (3)
- March 2026 (1)
Cinnabunnies How-To
Friday, March 19, 2021
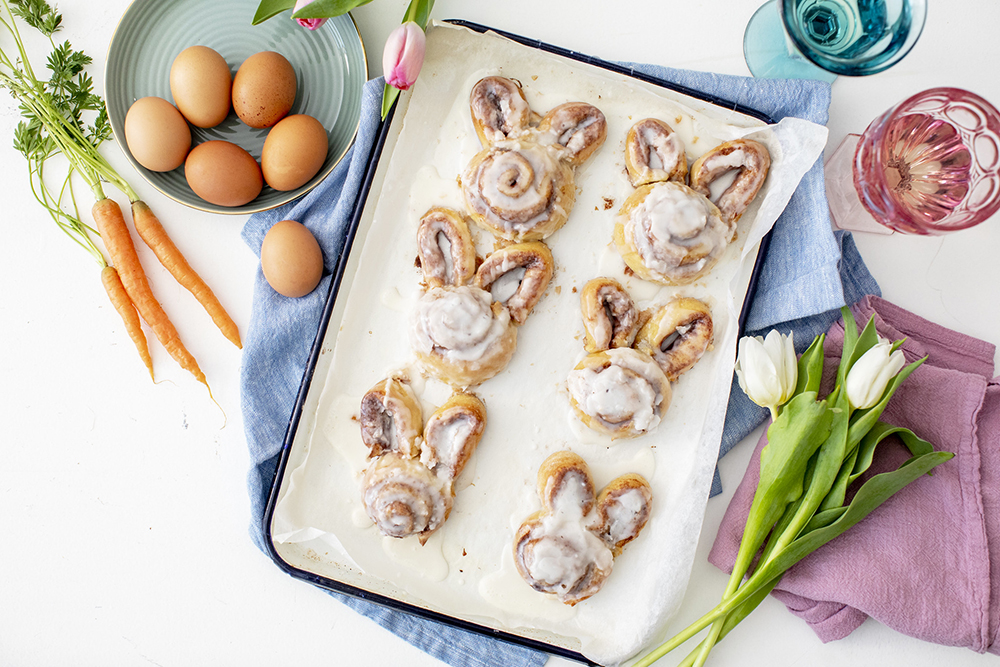
These cinnabunnies may be the cutest thing you eat all year! Follow along with these images to make sure you get the perfect bunny shape–we promise it's easy!
Once you have your 9x12" rectangle trimmed, covered in cinnamon sugar, and ready to go, make a cut 1/3 of the way through the long side of the dough. This should leave you with one rectangle that's about 9x4", and another that's about 9x8". Then cut the smaller 9x4" rectangle into 6 long strips, and cut each strip in half so that you have 12 smaller strips. (The larger 9x8" rectangle should still be intact!) For those of us who are visual learners out there, you should have something that looks kind of like this in front of you:

Next, tightly roll the larger, fully intact 9x8" rectangle from right to left. It should look like this, a bit like a log:

Now we're getting to the good stuff! Cut the log you just rolled up into 6 even pieces–each one should look like a tiny cinnamon roll! Place these evenly apart on your lined baking sheet, and give 'em a good pat.

Next, fold one of your 12 strips in half and attach it to the top of a cinnamon roll. Do the same with a second strip and attach it about half an inch away from the first strip. Voilà! Your bunny has ears. BUT–make sure you pinch the dough together well where the ears attach so that they stay together while baking, like so:

Once you've given all of your bunnies ears, they should look like this:

Cover these cuties with a towel or plastic wrap and let rise for about half an hour, then bake them at 350ºF for 15 min. Slather on the icing right away if you prefer melty icing, or wait 5-10 min for them to cool before applying if you prefer non-melty icing. Hope you have a hoppin' good time making these! Happy Easter!

Haven't orderd your Cinnabunnies kit yet? You can get it here through April 1st.
Other Posts You'll Love